Table of Contents
This document serves as a guide for using full text search (FTS) subsystem of the CUBA platform.
This manual is intended for developers building CUBA applications with full text search support. It is assumed that the reader is familiar with the Developer's Manual, which is available at www.cuba-platform.com/manual.
This guide, as well as any other CUBA platform documentation, is available at www.cuba-platform.com/manual.
CUBA full text search subsystem is based on the Apache Lucene framework, therefore familiarity with the framework will be beneficial. See lucene.apache.org/core.
If you have any feedback or would like to suggest an improvement for this manual, please contact us at www.cuba-platform.com/support/topics.
If you find an error in the document, please specify section number and attach a small piece of surrounding text to help us locate it.
Full-text search (FTS) capabilities of the CUBA platform provide unstructured search within the values of entity attributes and content of uploaded files.
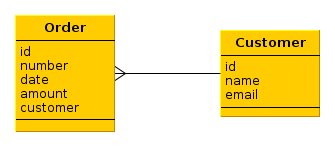
A distinctive aspect of full text search implementation in CUBA is its focus on business applications with complex data models. Particularly, search results include not only the entities that directly contain the search string but also the related entities which use this attribute when being displayed. For example, if an Order entity contains a link to a Customer and the search string contains the name of the customer, then search results will include both the Customer and the related Order. This behavior is logical for a user who typically sees the name of the customer in the order editing screen.
Search results are filtered according to the limitations applied by the platform’s security subsystem. I.e. if the current user’s access group does not allow access to certain entity instances, such instances will not appear in search results.
Full-text search subsystem contains two mutually related mechanisms: indexing and search.
If the FTS base project is included as base project in the application, and the cuba.fts.enabled property is enabled, then each time when an indexable entity is being saved to the database its identifier gets added to the indexing queue - SYS_FTS_QUEUE table.
A separate asynchronous process periodically extracts identifiers of changed entities from the queue, loads entity instances and indexes them. Indexing is performed using the Apache Lucene library. Lucene document contains the following fields:
-
Entity name and instance identifier.
-
all– concatenation of the entity attributes being indexed, which includes only local andFileDescriptortype attributes. If the attribute hasFileDescriptortype, the system will index the content of the corresponding file. Local attributes may have the following types: string, number, date, enumeration. -
links– concatenation of entities identifiers contained in indexed attributes having reference type.
Indexed attributes are the attributes of the entity and related entities (if any), which are declared in the FTS descriptor.
Index is stored in the file system; by default it is located in the ftsindex subfolder of the application work folder (defined by the cuba.dataDir property); for a standard deployment this folder is tomcat/work/app-core/ftsindex. Index location can be changed using the cuba.fts.indexDir property.
Search is performed according to the following rules:
-
If the search term is included in quotation marks, the system searches for the corresponding phrase – the same set of words in the same order ignoring the punctuation.
-
If the search term begins with "*", the system searches for the term as a substring in any part of a word in indexed data.
-
Otherwise search is performed by matching the search term with the beginnings of the words in indexed data.
For Russian and English languages search accounts for word forms.
Search algorithm contains two stages:
-
First, the search term is looked for in the
allfield of Lucene documents. All found entities are added to the results list. -
If the first stage produces results, the identifiers of found entities are then searched in the
linksfield of Lucene documents. All entities found at the second stage are also added to the list of search results.
If the search string contains several words (not enclosed in quotation marks) the system will search each word separately using OR condition. I.e. search results will include the entities containing at least one of the entered words.
Let us consider the simple case of linked Order and Customer entities mentioned above.

In this case, if all object attributes are indexed, indexing of two related instances of Order and Customer will create two Lucene documents with approximately the following content:
id: Order.id = "b671dbfc-c431-4586-adcc-fe8b84ca9617"
all: Order.number + Order.date + Order.amount = "001^2013-11-14^1000"
links: Customer.id = "f18e32bb-32c7-477a-980f-06e9cc4e7f40"
id: Customer.id = "f18e32bb-32c7-477a-980f-06e9cc4e7f40"
all: Customer.name + Customer.email = "John Doe^john.doe@mail.com"
Let’s assume our search string is "john":
-
First, the search is performed in
allfields of both documents. The system will find theCustomerentity and will include it in search results. -
Then, the system will search for the identifier of the previously found customer in the
linksfields of all documents. The system will find theOrderand will add it to search results as well.
This chapter describes the example of using the full text search subsystem in the Library sample application which can be downloaded by means of CUBA Studio.
We will split the task into the following stages:
-
Enable search functionality for the project, configure the indexing process and verify that it works.
-
Adjust the FTS configuration file to include entities from the sample Library data model.
-
Use the
EBookentity and the functionality described in the Workflow subsystem guide to illustrate search function for the loaded files.
-
Run CUBA Studio, go to window and download the Library project.
-
Open the Library project in Studio.
-
Open -> , include the fts project in the list of Base projects and save changes. Confirm action after Studio will suggest recreating Gradle scripts.
-
Select -> . At this point, the application will be assembled and deployed to the Tomcat application server located at
build/tomcat. -
Create the application database: -> .
-
Start the application server: -> .
-
Open the application’s web-interface at http://localhost:8080/app. Log into the system with the name
adminand passwordadmin. -
To enable full text search functionality, open -> in the application main menu, find and open the
app-core.fts:type=FtsManagerJMX bean. Open the Enable attribute using double click and check the Value checkbox.
Once the steps above are completed, full text search functionality will be added to the application and ready to work. If you log out of the system and then log in again, a search field will appear in the top right panel of the main application window. However, search will not produce any results because the data has not been indexed yet.
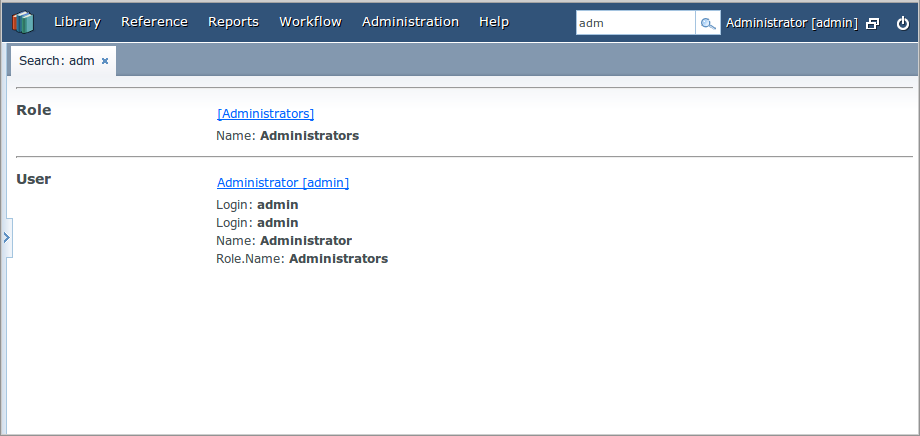
To start one-off indexing of the current state of the database (i.e. the entities listed in the FTS configuration file by default), open the app-core.fts:type=FtsManager JMX bean again and consequently invoke reindexAll() first and then processQueue(). After this, searching the "adm" string should give the following results:

You can use the platform’s scheduled tasks mechanism (see Application Development Guide -> CUBA Scheduled tasks) to invoke indexing process on a scheduled basis.
First, you will need to activate the task starting functionality itself. Add the following property to the app.properties file of the project core module:
cuba.schedulingActive = true
Restart the application server, log into the system as admin, open the screen, find and open the app-core.cuba:type=Scheduling JMX bean and make sure that the Active attribute is set to true.
Then open the -> screen, click and fill in the following attribute values for a new task:
-
Defined by: Bean
-
Bean name: cuba_FtsManager
-
Method name: processQueue()
-
Singleton: true
-
Period, sec: 30
Save the task, select it in the table and click . From now on, the system will start indexing changed entities every 30 seconds.
Automatic indexing does not cover the entities created before its start. To index such entities, open the screen and call sequentially the following methods of the app-core.fts:type=FtsManager JMX bean: reindexAll() and processQueue().
Create the fts.xml file with the following content in the source text directory of the core module:
<fts-config>
    <entities>

        <entity class="com.sample.library.entity.Author">
            <include re=".*"/>
        </entity>

        <entity class="com.sample.library.entity.Book">
            <include re=".*"/>
        </entity>

        <entity class="com.sample.library.entity.BookInstance">
            <include re=".*"/>
        </entity>

        <entity class="com.sample.library.entity.BookPublication">
            <include re=".*"/>
        </entity>

        <entity class="com.sample.library.entity.LibraryDepartment">
            <include re=".*"/>
        </entity>

        <entity class="com.sample.library.entity.LiteratureType">
            <include re=".*"/>
        </entity>

        <entity class="com.sample.library.entity.Publisher">
            <include re=".*"/>
        </entity>

        <entity class="com.sample.library.entity.Town">
            <include re=".*"/>
        </entity>

    </entities>
</fts-config>
This is the FTS configuration file, which in our case enables indexing of all domain model entities with all their attributes.
Add the following property to the app.properties file of the application core module:
cuba.ftsConfig = cuba-fts.xml fts.xml
As a result, indexing will include both the entities defined in the platform's cuba-fts.xml and the project’s fts.xml files.
Restart the application server. From now on, full text search should work for all entities of the application model as well as entities of the platform security subsystem: Role, Group, User.
Take the following steps to see the example of uploaded files content search: add the workflow base project, add EBook entity to the project and create and complete the book scanning workflow as described in the Workflow subsystem guide (see the section called “Additional Materials”). Further in this section it is assumed that the application already has an instance of EBook and that a file with the original book has already been uploaded as a result of the Book scanning process execution.
Add the following elements to the project’s fts.xml file:
...
        <entity class="com.sample.library.entity.EBook">
            <include name="publication.book"/>
            <include name="attachments.file"/>
        </entity>

        <entity class="com.haulmont.workflow.core.entity.CardAttachment" show="false">
            <include re=".*"/>
            <exclude name="card"/>

            <searchables>
                searchables.add(entity.card)
            </searchables>
        </entity>

    </entities>
</fts-config>
In order for search results screen to display the EBook instances properly, you should add @NamePattern annotation to the EBook class:
@NamePattern("%s|publication")
public class EBook extends Card {
...
After that, restart the application server. Open the screen, open the app-core.fts:type=FtsManager JMX bean and invoke sequentially reindexAll() and processQueue() to re-index the existing instances in the database and files according to the new search configuration. All new and changed data will be indexed automatically with a delay depending on the scheduled task interval, i.e. not longer than 30 seconds.
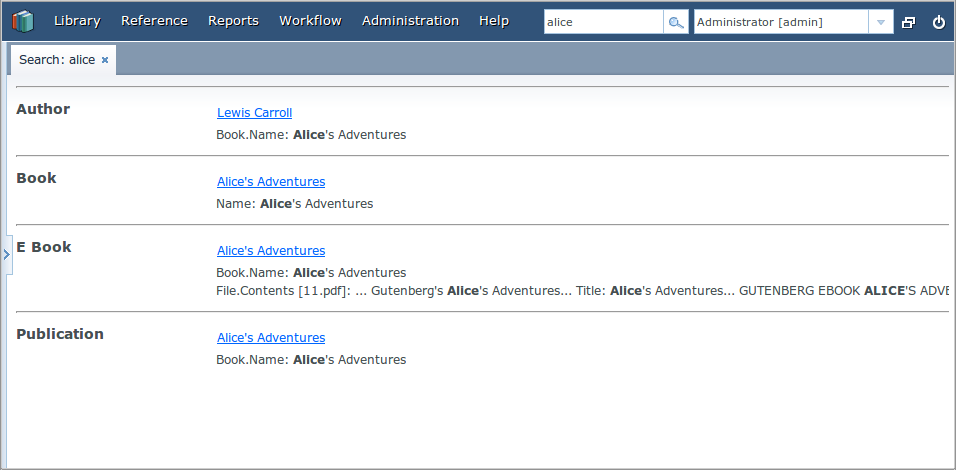
As a result, if the database contains a book called Alice's Adventures with an original PDF available, search results for "alice" will look like this:

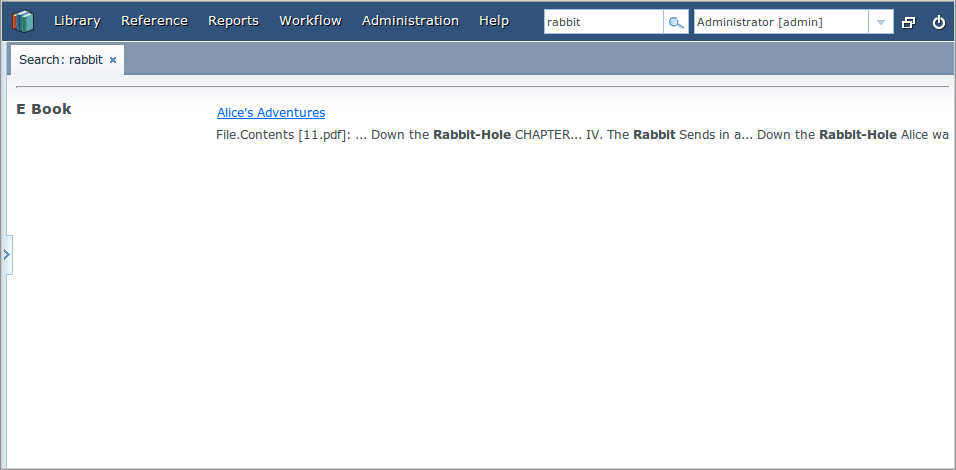
Search results for "rabbit" will look like this:

The full text search configuration file is an XML file, which is usually located in the src directory of the core module and contains the description of indexed entities and their attributes.
The set of FTS configuration files, including those defined in the base projects, is specified in the cuba.ftsConfig application property.
The file has the following structure:
fts-config - root element.
fts-config elements:
-
entities- list of entities to be indexed and searched.entitieselements:-
entity- indexed entity description.entityattributes:-
class- entity Java class. -
show- defines whether this entity should appear in the search results. Thefalsevalue is used for connecting entities which are not of interest to the user, but are required, for example, to link uploaded files and entities of the domain model. Default istrue.
entityelements:-
include- determines whether to include a single or multiple entity attributes in the index.includeattributes:-
re- regular expression to select attributes by name. Only the following attribute types are allowed: string, number, date, enumeration. -
name- attribute name. It can be reference attributes path (divided by period). The type is not checked. However, if the name is defined by a path, then the final attribute must be an entity. Including non-entity type attribute does not make sense here, as it must be indexed within its owning entity.
-
-
exclude- excludes attributes previously included byincludeelement. Possible attributes are the same as ininclude. -
searchables- a Groovy script to add arbitrary entities associated with the changed one to the indexing queue.For example, when a
CardAttachmentinstance is either added or removed, the associatedCardinstance should also be re-indexed. The reason is that theCardinstance itself will not be added to the queue, as it has not been changed (it stores a collection ofCardAttachmentistances). Thus it will not be shown in search results if matching data is found in its linked entity - a newly addedCardAttachment.The following objects are passed into the script at invocation:
-
searchables- the list of entities that should be appended. -
entity- the current entity instance, which is being added to the queue automatically.
Script example:
<entity class="com.haulmont.workflow.core.entity.CardAttachment" show="false"> ... <searchables> searchables.add(entity.card) </searchables> </entity> -
-
searchableIf- a Groovy script to exclude certain instances of the indexed entity from the queue.For example, you may not want to index old versions of documents.
When running the script, the
entityvariable - the current entity instance - is passed into it. The script should return a boolean value:trueif the current instance should be indexed, andfalseotherwise.Script example:
<entity class="com.haulmont.docflow.core.entity.Contract">
    ...
    <searchableIf>
        entity.versionOf == null
    </searchableIf>
</entity>
-
-
FTS configuration file example:
<fts-config>
    <entities>

        <entity class="com.sample.library.entity.Author">
            <include re=".*"/>
        </entity>

        <entity class="com.sample.library.entity.Book">
            <include re=".*"/>
        </entity>

        <entity class="com.sample.library.entity.BookInstance">
            <include re=".*"/>
        </entity>

        <entity class="com.sample.library.entity.BookPublication">
            <include re=".*"/>
        </entity>

        <entity class="com.sample.library.entity.Publisher">
            <include re=".*"/>
        </entity>

        <entity class="com.sample.library.entity.EBook">
            <include name="publication.book"/>
            <include name="attachments.file"/>
        </entity>

        <entity class="com.haulmont.workflow.core.entity.CardAttachment" show="false">
            <include re=".*"/>
            <exclude name="card"/>

            <searchables>
                searchables.add(entity.card)
            </searchables>
        </entity>

    </entities>
</fts-config>
This section lists the application properties that are relevant to the full text search subsystem.
- cuba.ftsConfig
-
Configuration parameter, specifies a set of FTS configuration files in the project.
The value of the property should include a list of files separated with spaces. Files are loaded according to the rules of the
Resourcesinterface.Used in the
Middlewareblock.Example:
cuba.ftsConfig = cuba-fts.xml fts.xml
All properties that are described below are runtime parameters stored in the database and available in the application code via the FtsConfig configuration interface.
- cuba.fts.enabled
-
The flag enabling the FTS functionality in the project.
Can be changed via the Enabled attribute of the
app-core.fts:type=FtsManagerJMX bean.Default value:
false - cuba.fts.indexDir
-
Absolute path to the directory storing indexed files. If not specified, the
ftsindexsubdirectory of the application work directory (defined by the cuba.dataDir property) is used; in the default deployment configuration, it istomcat/work/app-core/ftsindex.Default value: unspecified
- cuba.fts.indexingBatchSize
-
Number of records extracted from the indexing queue per one invocation of
processQueue().This limitation is relevant to the situation when the indexing queue contains a very large number of records, for example, after executing the
reindexAll()method of theapp-core.fts:type=FtsManagerJMX bean. In this case, indexing is done in batches, which takes more time, but creates a limited and predictable server load.Default value:
300 - cuba.fts.maxSearchResults
-
The maximum number of entries in the search result.
Default value:
100 - cuba.fts.searchResultsBatchSize
-
Number of elements in a single batch of search results. A user will need to click More on the results screen to view the next batch.
Default value:
5