Table of Contents
This document is the user manual for the CUBA Platform Workflow Subsystem.
This manual is intended for developers who use the CUBA platform to create applications with business processes management functionality. It is assumed that the reader is familiar with the Developer's Manual, which is available at www.cuba-platform.com/manual.
This manual, as well as other documentation on the CUBA platform, are available at www.cuba-platform.com/manual.
If you have any suggestions for improving this manual, please contact Technical Support at www.cuba-platform.com/support/topics.
When reporting errors in the documentation, please indicate the chapter number and include a small portion of the surrounding text to make the search easier.
Workflow represents a series of changes to the state of a certain card entity in accordance with a specified process, which involves both users and automatic operations. A typical example is the process where a certain document is approved by employees in an organization.
Below is the structure of the Workflow subsystem of the CUBA platform.
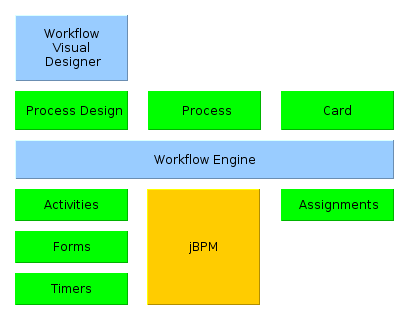
The main structural elements are:
-
Process Design - a process schema, as well as a collection of related scripts, variables, notification and message localization settings. The design defines the process, which is created and updated as a result of design deployment in the application.
-
Process - an executable description of the business process. The execution mechanism is based on the jBPM 4 framework, so the main element of the process is the descriptor of the state graph in jPDL. Furthermore, the process includes descriptors of user interface forms, lists of users assigned to execute process roles, localized messages, etc.
-
Card - a data model entity that is directly linked to the process instance. In most cases, the process card is a domain object with a state that may vary in accordance with the process. An example is a document awaiting approval or a ticket in the bug tracking system. If such a domain object does not exist, the card can be an artificial entity that simply reflects the current state of the process instance.
In a manner of speaking, the process defines the type of business process, while the card represents a single instance of this business process.
The process defines a set of states (nodes) and transitions between them, as well as the following associated objects:
-
Activities - the software code that is executed when transitioning to a particular state.
-
Forms - interactive screens that allow users to choose transitions.
-
Timers - the software code that is automatically triggered when a certain amount of time has passed after entering a certain state.
Assignment objects appear in course of process execution. They indicate that the user should take some action concerning the process.
The Workflow subsystem of the platform has an integrated visual process editor, Visual Designer, which allows designing processes and deploying them at application runtime. The set of possible states, actions, forms, and timers that make up processes is configured in the application at the development stage.
Below is the classes diagram of the main Workflow subsystem elements.

-
Design- the object that stores the process design. -
Proc- the executable process. Process attributes:-
design- link to the design that was used to create the process. -
name- the meaningful process name. The name is specified at the design stage. However, it can be set in the process editor screen as well. -
jbpmProcessKey- the process key in the jBPM execution engine. It is generated automatically when deploying the process design. -
code- the process code that can be referenced by software tools. Defaults tojbpmProcessKey, but can be changed in the process editor screen. -
messagesPack- the name of the messages pack that contains localized names of states and transitions, various descriptions and process messages. This package is generated automatically at the process design deployment stage and is stored along with other process files in the appropriate subdirectory of the application configuration directory. -
roles- list ofProcRoletype objects that define the roles of process participants.
-
-
ProcRole- a process role. Objects of this type are created automatically when the process design is deployed, if it contains Assignment states, which assign tasks to users and halt the execution of the process until the user takes required actions. Initially,ProcRoleobjects are not connected to any system users. However, you can assign a default holder for each role in the process editor screen. -
DefaultProcActor- list of holders of a certain role; this list is defined at the process level. -
Card- the process card. Generally, a particular domain entity is inherited from theCardclass to acquire the ability to move through the process.Cardattributes:-
description- an optional text description of a given card instance that allows the user to distinguish between cards without loading attributes of a particular type that extends theCard. For example, if the card represents a document, then it may be useful to enter the type, number, and date of this document in thedescriptionfield. -
proc- the link to a process. -
roles- the list of CardRole type objects that define the process role holders for a given card. -
jbpmProcessId- the identifier of the process instance in the jBPM execution engine. -
state- the name of the current process state. -
assignments- the list ofAssignmentobjects created in this process instance. -
attachments- the list ofCardAttachmenttype objects that enable associating the files downloaded during process execution with the card.
-
-
CardRole- the entity that defines the process role holders for a given card.CardRoleattributes:-
card- the card, for which the role holder is defined. -
procRole- the process role. -
user- the role holder of theUsertype (a system user).
-
-
CardAttachment- an attachment that enables associating downloaded files with the card. Attributes (together with theAttachmentsuperclass):-
card- the card. -
assignment- if the file is uploaded during the assignment stage, this attribute contains a link to the correspondingAssignmentobject. -
file- the uploaded file of theFileDescriptortype. -
name- the attachment name. -
comment- the comment on the attachment.
-
-
Assignment- the assignment. Object of this type are created in the system when the process transitions to the Assignment state. In this state, the process pauses and waits for a command from the user or the system. When a finish command is received, thefinished,finishedByUserandoutcomeattributes are set for the assignment, and the process transitions to its next state. For one card and user, only one pending assignment can exist.Assignmentattributes include:-
card- the card. -
user- the system user the assignment has been issued for. -
proc- the same process as the one set for the card at the moment of assignment creation. -
name- the assignment name. -
description- the assignment description. -
jbpmProcessId- the identifier of a jBPM process instance corresponding to the card executed at the time of assignment creation. -
dueDate- the assignment completion deadline. -
finished- the actual time when the assignment has been completed. Isnulluntil the assignment is completed. -
finishedByUser- the user who has actually completed the assignment. Isnulluntil the assignment is completed. -
outcome- the name of the assignment state outcome that the user has selected. For example, the business process schema may contain an assignment node that asks the user to check whether a particular bug has been addressed, and to select one of the two options to continue the process: "OK" or "Not OK". If the user chooses "OK", then this string is written to theoutcomefield of the assignment, and vice versa. -
attachments- the list ofCardAttchmentobjects that were created for this assignment.
-
In this chapter we will cover the use of the Workflow subsystem in the Library sample application which can be downloaded by means of CUBA Studio.
Our task is to provide the application with the ability to create and keep track of electronic versions of books that are available in the library. The process of creating an electronic version must follow these steps:
-
An arbitrary system user creates an
EBookobject and specifies a publication for which an electronic version must be created. Then the scanning process begins. -
A user with the
Managerrole receives an assignment to approve or reject the book scanning. If the manager approves the scanning, the process continues to the next stage. Otherwise, the process finishes. -
After the manager approves this
EBook, an assignment is created and sent to a user who has theOperatorrole. The operator digitizes the book and, if successful, attaches a file containing the electronic version of the book to theEBook. -
At the end of the process, the
EBookobject can be in one of the three states:-
Done- scanning was successful and the object contains an attached file with the electronic version of the book. -
Failed- scanning failed. -
Not approved- scanning was not approved by the manager.
-
-
Run CUBA Studio, go to window and download the Library project.
-
Open the Library project in Studio.
-
Open the project properties window ( -> ) and activate the workflow project in the Base projects projects list. Save the changes. Studio will prompt to recreate Gradle scripts. Choose "Yes".
-
Choose -> . At this stage, the application will be built and deployed to the Tomcat application server located at
build/tomcat. -
Create the application database: -> .
-
Launch the application server: -> .
-
Open the application web interface at http://localhost:8080/app. Log in to the system by entering the username
adminand passwordadmin. The main menu should include the option that provides access to Workflow subsystem management screens. -
Choose -> in Studio and then open the project
c:\work\library\library.iprin IntelliJ IDEA.
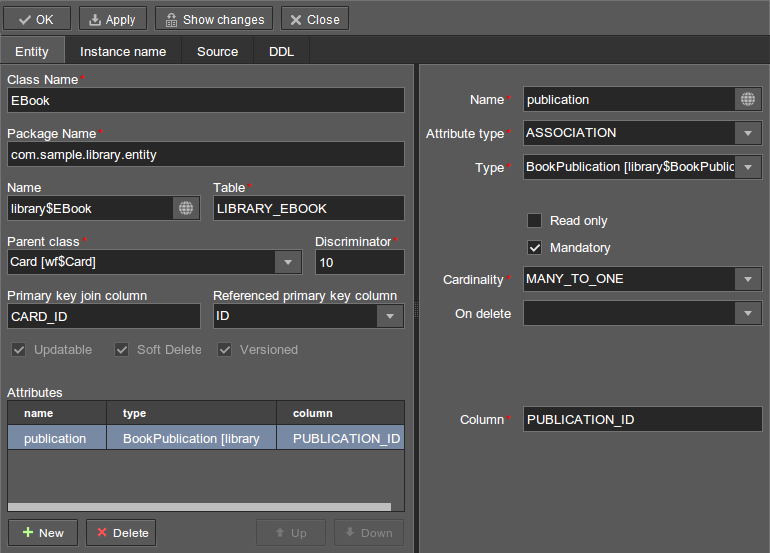
Let us create an EBook entity class that will represent the electronic version of the book publication. The Ebook class must be derived from the Card (process card) in order to manage the EBook state in accordance with the required business process.
Go to the Entities tab on the Studio navigation panel, select the com.sample.library.entity package and click . Specify the following entity properties:
-
Class name -
EBook -
Table -
LIBRARY_EBOOK -
Parent class -
Card [wf$Card]. TheInheritanceType.JOINEDinheritance strategy is defined for theCardclass, thusEBookwill be stored in a separate table, and its primary key will be an external key that references theCardprimary key. -
Discriminator -
10. A discriminator is the value of a base type field that will be set in the database for all instances of this specific type. In this case, the following annotations have been defined for theCardbase class:@DiscriminatorColumn(name = "CARD_TYPE", discriminatorType = DiscriminatorType.INTEGER) @DiscriminatorValue("0")This means that the CARD_TYPE field must store an integer value, which will be equal to
0for base type instances. Therefore, it is sufficient to assign any value other than0for theEBooktype. -
In the Primary key join column field, the CARD_ID name for the primary key of the created entity is automatically generated.
-
In the Referenced primary key column field, the primary key for the WF_CARD table that stores the base
Cardentity is selected. In this case, it is ID.
Next, let us create an entity attribute containing a link to the book publication.
Click under the list of attributes and specify the following properties in the Create attribute window:
-
Name -
publication -
Attribute type -
ASSOCIATION -
Type -
BookPublication [library$BookPublication] -
Mandatory -
on. This means the attribute is required. -
Cardinality -
MANY_TO_ONE. This means that severalEBookinstances can be created for oneBookPublicationinstance. -
The Column field will contain the appropriate column name - PUBLICATION_ID.
Save the changes. As a result, the following entity class will be created:
package com.sample.library.entity;

import javax.persistence.*;

import com.haulmont.workflow.core.entity.Card;

@PrimaryKeyJoinColumn(name = "CARD_ID", referencedColumnName = "ID")
@DiscriminatorValue("10")
@Table(name = "LIBRARY_EBOOK")
@Entity(name = "library$EBook")
public class EBook extends Card {
    private static final long serialVersionUID = -7326357893869004530L;

    @ManyToOne(fetch = FetchType.LAZY, optional = false)
    @JoinColumn(name = "PUBLICATION_ID")
    protected BookPublication publication;

    public void setPublication(BookPublication publication) {
        this.publication = publication;
    }

    public BookPublication getPublication() {
        return publication;
    }
}
After the entity class is created, the Studio will report that the data model has been changed and now differs from the current database schema. It is necessary to generate the scripts and to start the database creation or update process.
Click in the Entites section of the navigation panel. The Studio will generate the database update and initialization scripts, which include the creation of the LIBRARY_EBOOK table and its foreign keys. Since our database contains no data and can be easily recreated, you can safely delete the scripts in the Update scripts tab. After that, save the changes.
Choose -> to stop the application server. The -> menu item, which should be used, will become available in a few seconds.
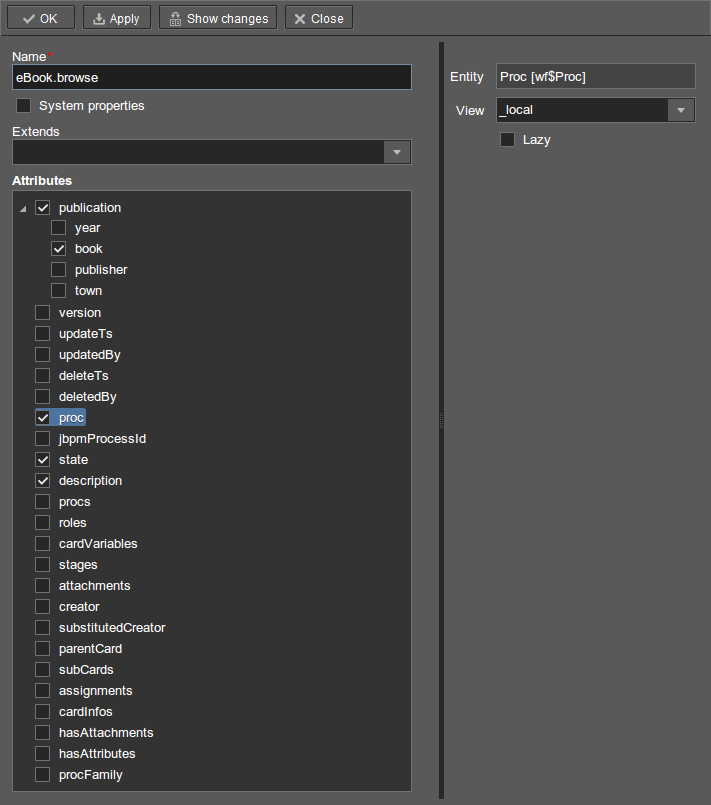
Let us create the standard browser and editor for the EBook entity. To do this, we must first define views for these screens.
Select EBook in the Entities section of the navigation panel and click . Set the view name in the Name field to eBook.browse. All local (non-reference) entity attributes in the Attributes panel are selected by default. Uncheck them all and select publication, which is the only attribute that we need at this stage. Since this attribute is a reference to the BookPublication entity, the tree displays the attributes of this entity. Check the book attribute, and select _minimal in the View field on the settings panel on the right. Save the changes.
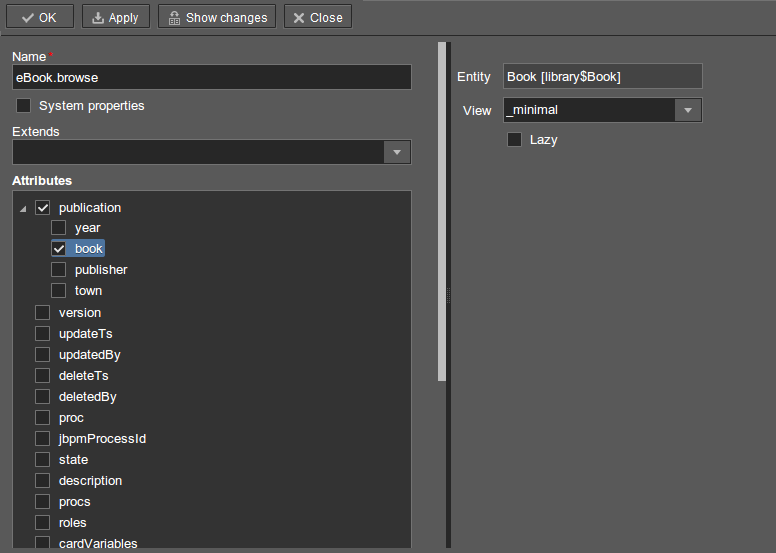
Now, if you open the views file in IDE, it will contain the following descriptor:
<view class="com.sample.library.entity.EBook"
      name="eBook.browse">
    <property name="publication">
        <property name="book"
                  view="_minimal"/>
    </property>
</view>
Similarly, let us create an eBook.edit view for the editor. At this stage, this view is identical to eBook.browse, but they will be different in the future.
After creating the views, select EBook in the Entities section of the navigation panel once again and click . In the window that appears, select eBook.browse for Browse view, eBook.edit for Edit view, and click . The Studio will open the Screens section of the navigation panel and display the created screens.
After creating the standard screens, you can launch the server ( -> ), log in to the application and make sure that the EBook entity is functional.
Now, we can move on to the main part of the tutorial, which involves designing the business process and implementing the EBook objects processing in accordance with the business process. In this section, we will create a process design and then deploy it for execution.
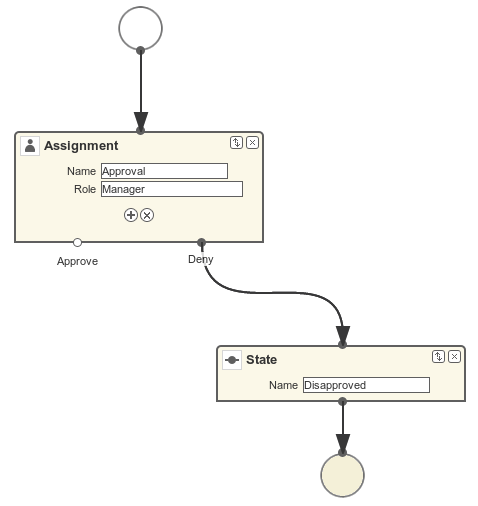
Open the -> screen in the web interface of the running application and click . Enter the name of the process design, for example Book scanning, and click . A new CUBA Workflow Designer window will open.
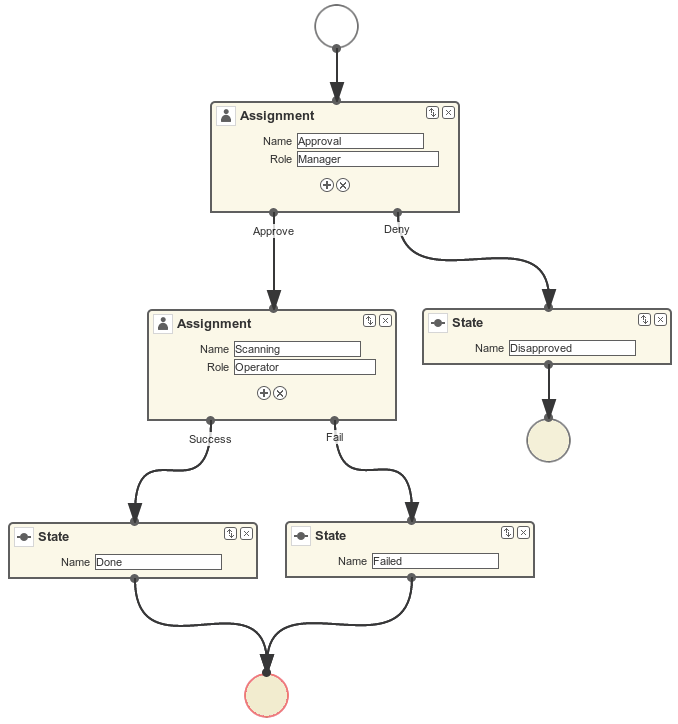
First, drag and drop the Start node onto the designer workspace. Then, drag and drop the Assignment node. Connect the Start node with the Assignment node input. Connect the Start output with the Assignment input. In the Assignment node, set the name to Approval and the role to Manager. Click the button in the Assignment node to create an output and specify its name: Approve. Then, add another output: Deny. As a result, an assignment will be generated for a user with the Manager role when the running process transitions to the Approval state. The process will stop running until the user selects one of the outputs: Approve or Deny.
If the manager rejects the process, it should transition to the Not approved state and finish. To register this state, add the State node with the name Not approved and connect its input to the Deny output in the Approval node. Then, add the End node and connect it with the output of the Not approved node. The running process will record the Not approved state in the card (an EBook instance) and finish without stopping.
The following schema should be produced at this stage:
Click to save the current changes.
Add another Assignment node, set its name to Scanning, and assign the Operator role to it. Add the Success and Fail outputs. Connect the Scanning input to the Approve output of the Approval node. As a result, when the process is approved by the manager at runtime, it will transition to the Scanning state, stop running and issue an assignment to a user with the Operator role. The process will resume running after the user completes the assignment by selecting one of the outputs.
To register the final process state, add two State nodes, Done and Failed, and connect them to the appropriate Scanning output nodes. Then, add another End node and connect it to the Done and Failed node outputs.
As a result the schema should look like this:
If the scanning is successful, the operator must attach the file with the electronic version of the book to the object. To implement this, we will add the form that will be used for interaction between the process and the user.
Select the Scanning node and expand the Forms section in the right panel of the designer. Click . Set the following attributes:
-
Transition - the name of the output where the form will be shown. Select
Success. -
Form - the type of the form. Select
Transition. -
Hide Attachments - hide the components for attachment selection. Leave this box empty.
Below are the form settings on the right panel of the designer:
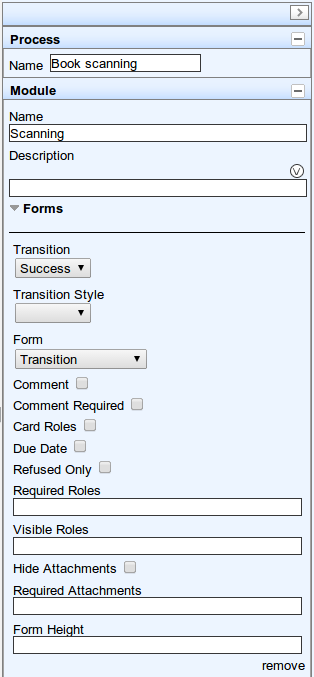
Thus, if the assignment is completed with Success, a dialog form will be displayed, and the operator will be able to add the attachments, i.e. files with the scanned version of the book.
Save the process design and close the CUBA Workflow Designer window.
The created process design must be compiled. In other words, it is necessary to create scheme-based executable code for the process. Select the line with the design in the Processes Design window and click . If the compilation is successful, the Compilation date column will contain the current time.
The next step is the deployment of the process. Select the line with the compiled design and click . In the dialog window, leave the Create new process box checked and click . The following actions will be performed:
-
A new
Procobject will be created in the application database along with theProcRoleobjects that correspond to roles used in the design. -
A directory with the name
proc_<date_time>(wheredate_timeis the time process deployment) will be created in theprocesssubdirectory of the Middleware configuration directory. This directory contains the following files required for process execution: jPDL, the forms descriptor, and the localized message pack. -
The jPDL file is sent to the jBPM execution engine, which creates the corresponding entries in the JBPM4_DEPLOYMENT and JBPM4_DEPLOYPROP tables. The jBPM process identifier is a string that is identical to the deployment directory name (
proc_<date_time>). This identifier is also recorded in thejbpmProcessKeyattribute of theProcobject.
The process is ready for running. However, for the purposes of our example, we need one extra preparation - assigning default holders for process roles.
Open the -> screen, select the created process and open it for editing. In the list of process roles, select the Manager and Operator roles, and add role holders in the Default participants list. Role holders must be system users (manager and operator, respectively). The process editor will look as follows:
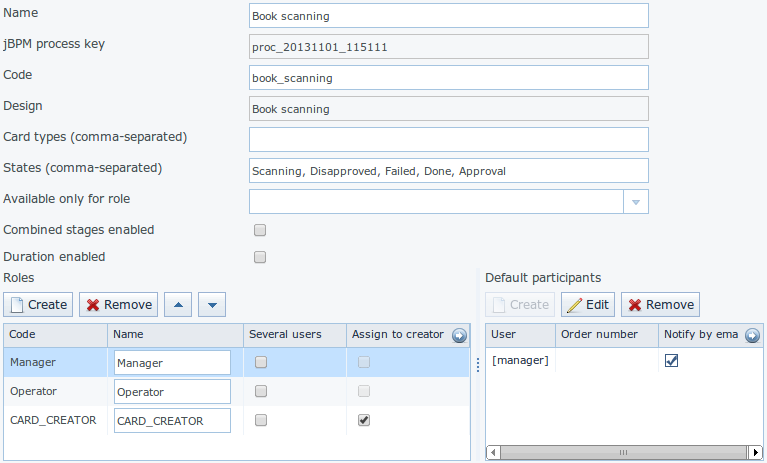
Apart from the roles explicitly specified in the design, the system has created the CARD_CREATOR role with the Assign to creator attribute. This role can be used to allow the user who created the card to become a process participant automatically. This role is not used in the described example.
It is recommended to set the process Code attribute to some meaningful unique value, since in the software code this attribute helps easily locate the process that should be run. In this case, set the value to book_scanning.
Typically, the process design is developed iteratively, so the system provides the ability to deploy the same changeable design repeatedly by updating the existing process. In fact, the following occurs when we deploy the design in the existing process:
-
The ability to migrate incomplete process instances (in other words, active cards) for the new process schema is verified.
-
A new
proc_<date_time>directory is created, wheredate_timeis the process deployment time. -
A new process description with an identifier that is equivalent to the name of the deployment directory is created in the jBPM execution engine. This new identifier is set in the j
bpmProcessKeyattribute of theProcobject. -
Active cards are migrated.
To update the process in accordance with the changed design, uncheck the Create new process checkbox during design deployment and choose the process to be updated from the Existing process drop-down list.
In this section, we will adjust the browser and editor for the EBook entity so that users can work with them in accordance with the business process.
The basic logic associated with the process is implemented in the EBook editor.
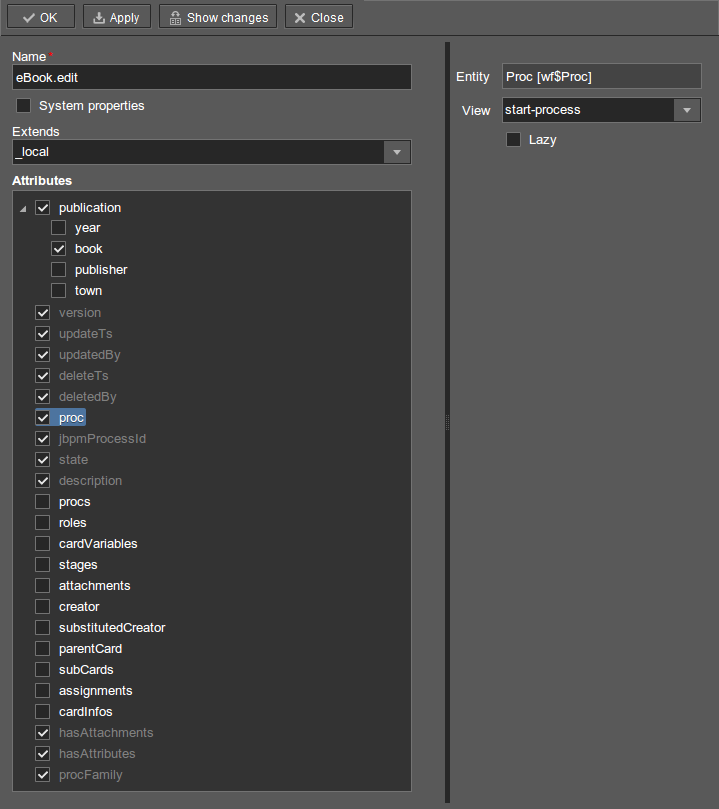
Let us start with revising the view that is used to load the EBook entity in the screen. Return to Studio, find the eBook.edit view in the Entities section of the navigation panel and open it for editing.
Select the _local value for the Extends field, which means that the current view will include all non-reference entity attributes. In addition, include the proc attribute and set the start-process view for it in the View field.
Now let us return to the screen. Find the ebook-edit.xml screen on the Screens section of the navigation panel and open it for editing. Choose the XML tab and completely replace its contents with the following code:
<?xml version="1.0" encoding="UTF-8" standalone="no"?>
<window xmlns="http://schemas.haulmont.com/cuba/window.xsd"
        caption="msg://editCaption"
        class="com.sample.library.gui.ebook.EBookEdit"
        datasource="eBookDs"
        focusComponent="fieldGroup"
        messagesPack="com.sample.library.gui.ebook">
    <dsContext>
        <datasource id="eBookDs"
                    class="com.sample.library.entity.EBook"
                    view="eBook.edit"/>
        <collectionDatasource id="attachmentsDs"
                              class="com.haulmont.workflow.core.entity.CardAttachment"
                              view="card-edit">
            <query>
                <![CDATA[select a from wf$CardAttachment a where a.card.id = :ds$eBookDs order by a.createTs]]>
            </query>
        </collectionDatasource>
    </dsContext>
    <layout expand="windowActions"
            spacing="true">
        <hbox spacing="true">
            <fieldGroup id="fieldGroup"
                        datasource="eBookDs"
                        width="400px">
                <field id="publication"
                       width="100%"/>
                <field id="description"
                       width="100%"/>
            </fieldGroup>
        </hbox>
        <groupBox caption="Process"
                  orientation="horizontal"
                  spacing="true"
                  width="400px">
            <label id="stateLabel"
                   align="MIDDLE_LEFT"/>
            <hbox id="actionsBox"
                  align="MIDDLE_RIGHT"
                  spacing="true"/>
        </groupBox>
        <groupBox caption="Attachments"
                  width="400px">
            <table id="attachmentsTable"
                   height="100px"
                   width="100%">
                <rows datasource="attachmentsDs"/>
                <columns>
                    <column id="file"/>
                    <column id="file.size"/>
                    <column id="createTs"/>
                </columns>
            </table>
        </groupBox>
        <iframe id="windowActions"
                height="100%"
                screen="editWindowActions"/>
    </layout>
</window>
Return to the Layout tab. The resulting screen layout is shown below:
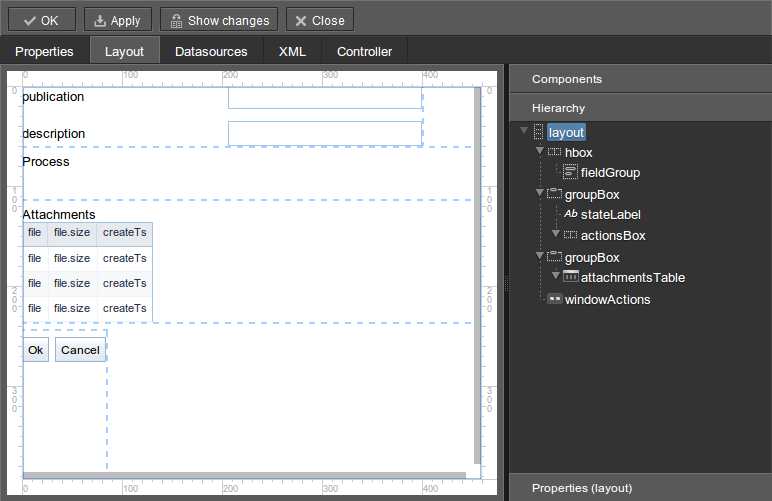
Below are the new screen elements.
-
The
descriptionfield of thefieldGroupcomponent displays the value of thedescriptioncard attribute. -
groupBoxwith theProcessheader contains the following elements:-
labelwith thestateLabelidentifier shows the current state of the card. -
Inside the
hboxcontainer with theactionsBoxidentifier, we will programmatically create the buttons that allow the user to select an output of the assignment, or, in other words, an action for the process. -
The
attachmentsTabletable is used to show attachments that are created by the operator at theScanningstage of the process. The table is linked to theattachmentsDsdatasource.
-
Choose the Controller tab and replace its contents with the following code:
package com.sample.library.gui.ebook;

import com.haulmont.cuba.core.entity.Entity;
import com.haulmont.cuba.core.global.CommitContext;
import com.haulmont.cuba.core.global.LoadContext;
import com.haulmont.cuba.core.global.PersistenceHelper;
import com.haulmont.cuba.gui.components.*;
import com.haulmont.cuba.gui.data.DataSupplier;
import com.haulmont.cuba.gui.data.DsContext;
import com.haulmont.cuba.gui.export.ExportDisplay;
import com.haulmont.cuba.gui.xml.layout.ComponentsFactory;
import com.haulmont.workflow.core.app.WfService;
import com.haulmont.workflow.core.entity.*;
import com.haulmont.workflow.core.global.AssignmentInfo;
import com.haulmont.workflow.core.global.WfConstants;
import com.haulmont.workflow.gui.base.action.ProcessAction;
import com.sample.library.entity.EBook;

import javax.inject.Inject;
import java.util.ArrayList;
import java.util.List;
import java.util.Map;
import java.util.Set;

public class EBookEdit extends AbstractEditor<EBook> {

    @Inject
    protected WfService wfService;
    @Inject
    protected ComponentsFactory componentsFactory;
    @Inject
    protected BoxLayout actionsBox;
    @Inject
    protected DataSupplier dataSupplier;
    @Inject
    protected Label stateLabel;
    @Inject
    protected FieldGroup fieldGroup;
    @Inject
    protected Table attachmentsTable;
    @Inject
    protected ExportDisplay exportDisplay;

    @Override
    public void init(Map<String, Object> params) {
    }

    @Override
    protected void postInit() {
        EBook eBook = getItem();

        if (PersistenceHelper.isNew(eBook)) {
            initProcess(eBook);
        }

        if (eBook.getState() == null) {
            stateLabel.setValue("State: not started");
        } else {
            stateLabel.setValue("State: " + eBook.getLocState());
            fieldGroup.setEditable(false);
        }

        initProcessActions(eBook);

        initAttachmentsTable();
    }

    private void initProcess(final EBook eBook) {
        LoadContext loadContext = new LoadContext(Proc.class);
        loadContext.setQueryString("select p from wf$Proc p where p.code = :code")
                .setParameter("code", "book_scanning");
        loadContext.setView("start-process");
        Proc proc = dataSupplier.load(loadContext);
        if (proc != null)
            eBook.setProc(proc);
        else
            throw new IllegalStateException("Process not found");

        eBook.setRoles(new ArrayList<CardRole>());

        for (ProcRole procRole : proc.getRoles()) {
            if (procRole.getAssignToCreator())
                continue;
            CardRole cardRole = new CardRole();
            cardRole.setCard(eBook);
            cardRole.setProcRole(procRole);
            List<DefaultProcActor> defaultProcActors = procRole.getDefaultProcActors();
            if (defaultProcActors.isEmpty())
                throw new IllegalStateException("Default actor is not assigned for role " + procRole.getName());
            cardRole.setUser(defaultProcActors.get(0).getUser());
            eBook.getRoles().add(cardRole);
        }

        getDsContext().addListener(new DsContext.CommitListener() {
            @Override
            public void beforeCommit(CommitContext context) {
                context.getCommitInstances().addAll(eBook.getRoles());
            }

            @Override
            public void afterCommit(CommitContext context, Set<Entity> result) {
            }
        });
    }

    private void initProcessActions(EBook eBook) {
        AssignmentInfo assignmentInfo = wfService.getAssignmentInfo(eBook);
        if (eBook.getJbpmProcessId() == null && eBook.getState() == null) {
            addProcessAction(WfConstants.ACTION_START, assignmentInfo);
        } else if (assignmentInfo != null) {
            for (String actionName : assignmentInfo.getActions()) {
                addProcessAction(actionName, assignmentInfo);
            }
        }
    }

    private void addProcessAction(String actionName, AssignmentInfo assignmentInfo) {
        ProcessAction action = new ProcessAction(getItem(), actionName, assignmentInfo, this);
        Button button = componentsFactory.createComponent(Button.NAME);
        button.setAction(action);
        button.setAlignment(Alignment.MIDDLE_RIGHT);
        actionsBox.add(button);
    }

    private void initAttachmentsTable() {
        attachmentsTable.addGeneratedColumn("file", new Table.ColumnGenerator<CardAttachment>() {
            @Override
            public Component generateCell(final CardAttachment attachment) {
                LinkButton link = componentsFactory.createComponent(LinkButton.NAME);
                link.setCaption(attachment.getFile().getName());
                link.setAction(new AbstractAction("") {
                    @Override
                    public void actionPerform(Component component) {
                        exportDisplay.show(attachment.getFile());
                    }
                });
                return link;
            }
        });
    }
}
Below is the explanation of the controller code fragments.
The postInit() method is called after the screen is initialized and the EBook instance is loaded with the view specified in the XML-descriptor (in this case, it is eBook.edit).
When the EBook instance specified in the screen is loaded, the application verifies whether this instance is new or retrieved from the database. In the first case, the control is passed to the initProcess() method, which prepares the card and the screen for the launch of the new process instance.
        protected void postInit() {
        EBook eBook = getItem();

        if (PersistenceHelper.isNew(eBook)) {
            initProcess(eBook);
        }
Then, depending on the state of the card, components are initialized: stateLabel displays the current state, and for fieldGroup editing is prevented if the process has already started:
    protected void postInit() {
    ...
        if (eBook.getState() == null) {
            stateLabel.setValue("State: not started");
        } else {
            stateLabel.setValue("State: " + eBook.getLocState());
            fieldGroup.setEditable(false);
        }
Then methods are invoked that initialize possible user actions and attachments table:
    protected void postInit() {
    ...
        initProcessActions(eBook);

        initAttachmentsTable();
    }
Below is the initProcess() method.
Initially, the method loads a Proc object instance from the database with the book_scanning code, which is the process that we have created. If the data is loaded successfully, the Proc instance is set for the EBook card:
     private void initProcess(final EBook eBook) {
        LoadContext loadContext = new LoadContext(Proc.class);
        loadContext.setQueryString("select p from wf$Proc p where p.code = :code")
                .setParameter("code", "book_scanning");
        loadContext.setView("start-process");
        Proc proc = dataSupplier.load(loadContext);
        if (proc != null)
            eBook.setProc(proc);
        else
            throw new IllegalStateException("Process not found");
Then, the CardRole objects (role holders for this card) are initialized. The roles may be initialized in various ways, including interactive, for example, by allowing the card creator to choose role holders. The main concern when the process is changed to any state of the Assignment type is to ensure that the role required for this state has been assigned. In our example, the role holders have been assigned in DefaultProcActor objects during the process setup stage. Therefore, we will retrieve them from there and transfer them to CardRole objects:
     private void initProcess(final EBook eBook) {
    ...
        eBook.setRoles(new ArrayList<CardRole>());

        for (ProcRole procRole : proc.getRoles()) {
            if (procRole.getAssignToCreator())
                continue;
            CardRole cardRole = new CardRole();
            cardRole.setCard(eBook);
            cardRole.setProcRole(procRole);
            List<DefaultProcActor> defaultProcActors = procRole.getDefaultProcActors();
            if (defaultProcActors.isEmpty())
                throw new IllegalStateException("Default actor is not assigned for role " + procRole.getName());
            cardRole.setUser(defaultProcActors.get(0).getUser());
            eBook.getRoles().add(cardRole);
        }
In the next fragment, all the created CardRole objects are added to CommitContext before committing the screen. As there is no cascade saving for Card and CardRole, the Middleware will throw an error if the created CardRole objects referenced by the Card object are not explicitly saved in the same transaction. Typically, the inclusion of all changed instances in CommitContext is controlled by datasources. However, in this case we will create and link objects manually, so the following code is required:
     private void initProcess(final EBook eBook) {
    ...
        getDsContext().addListener(new DsContext.CommitListener() {
            @Override
            public void beforeCommit(CommitContext context) {
                context.getCommitInstances().addAll(eBook.getRoles());
            }

            @Override
            public void afterCommit(CommitContext context, Set<Entity> result) {
            }
        });
    }
The methods below initialize the buttons that correspond to possible user actions on the process, and the attachments table.
The information about the current assignment for this card is loaded in the initProcessActions() method. If such an assignment exists for the current user, the corresponding buttons are created in the addProcessAction() method:
    private void initProcessActions(EBook eBook) {
        AssignmentInfo assignmentInfo = wfService.getAssignmentInfo(eBook);
        if (eBook.getJbpmProcessId() == null && eBook.getState() == null) {
            addProcessAction(WfConstants.ACTION_START, assignmentInfo);
        } else if (assignmentInfo != null) {
            for (String actionName : assignmentInfo.getActions()) {
                addProcessAction(actionName, assignmentInfo);
            }
        }
    }

    private void addProcessAction(String actionName, AssignmentInfo assignmentInfo) {
        ProcessAction action = new ProcessAction(getItem(), actionName, assignmentInfo, this);
        Button button = componentsFactory.createComponent(Button.NAME);
        button.setAction(action);
        button.setAlignment(Alignment.MIDDLE_RIGHT);
        actionsBox.add(button);
    }
The attachments table is a standard Table component associated with the attachmentsDs datasource that loads CardAttachment instances related to this card. In the table, a column is generated for the file attribute, which provides the ability to download the attachment by clicking the filename. The column cells display the LinkButton component, which invokes the corresponding file download on click using the ExportDisplay interface.
    private void initAttachmentsTable() {
        attachmentsTable.addGeneratedColumn("file", new Table.ColumnGenerator<CardAttachment>() {
            @Override
            public Component generateCell(final CardAttachment attachment) {
                LinkButton link = componentsFactory.createComponent(LinkButton.NAME);
                link.setCaption(attachment.getFile().getName());
                link.setAction(new AbstractAction("") {
                    @Override
                    public void actionPerform(Component component) {
                        exportDisplay.show(attachment.getFile());
                    }
                });
                return link;
            }
        });
    }
Let us update the views that are used to load the EBook instances list into the screen. Find the eBook.browse view on the Entities section of the navigation panel and open it for editing. Include the proc, state and description attributes. For the proc attribute, set the _local view in the View field.
.
Find the ebook-browse.xml screen on the Screens section of the navigation panel and open it for editing. Choose the XML tab and completely replace its contents with the following code:
<?xml version="1.0" encoding="UTF-8" standalone="no"?>
<    window xmlns="http://schemas.haulmont.com/cuba/window.xsd"
        caption="msg://browseCaption"
        class="com.sample.library.gui.ebook.EBookBrowse"
        lookupComponent="eBookTable"
        messagesPack="com.sample.library.gui.ebook">
    <dsContext>
        <collectionDatasource id="eBookDs"
                              class="com.sample.library.entity.EBook"
                              view="eBook.browse">
            <query>
                <![CDATA[select e from library$EBook e order by e.createTs]]>
            </query>
        </collectionDatasource>
    </dsContext>
    <layout expand="eBookTable"
            spacing="true">
        <filter id="filter"
                datasource="eBookDs">
            <properties include=".*"/>
        </filter>
        <table id="eBookTable"
               height="100%"
               width="100%">
            <rows datasource="eBookDs"/>
            <columns>
                <column id="publication"/>
                <column id="description"/>
                <column id="locState"/>
            </columns>
            <rowsCount/>
            <actions>
                <action id="remove"/>
            </actions>
            <buttonsPanel id="buttonsPanel"
                          alwaysVisible="true">
                <button id="createBtn"
                        action="eBookTable.create"/>
                <button id="editBtn"
                        action="eBookTable.edit"/>
                <button id="removeBtn"
                        action="eBookTable.remove"/>
            </buttonsPanel>
        </table>
    </layout>
</window>
The code contains the following differences from the standard browser screen:
-
descriptionandlocStatehave been added to the columns list of theeBookTable. These attributes provide the description of the card and the localized name of the current state. -
createandedithave been removed from the list of declaratively created actions in theeBookTabletable. The corresponding buttons in thebuttonsPanelhave been kept because we will programmatically create these actions in the controller code.
Return to the Layout tab. The layout of the screen will be as follows:
Open the Controller tab and replace its contents with the following code:
package com.sample.library.gui.ebook;

import java.util.Map;

import com.haulmont.cuba.core.entity.Entity;
import com.haulmont.cuba.gui.components.AbstractLookup;
import com.haulmont.cuba.gui.components.Table;
import com.haulmont.cuba.gui.components.actions.CreateAction;
import com.haulmont.cuba.gui.components.actions.EditAction;

import javax.inject.Inject;

public class EBookBrowse extends AbstractLookup {

    @Inject
    protected Table eBookTable;

    @Override
    public void init(Map<String, Object> params) {
        eBookTable.addAction(new CreateAction(eBookTable) {
            @Override
            protected void afterCommit(Entity entity) {
                eBookTable.getDatasource().refresh();
            }
        });
        eBookTable.addAction(new EditAction(eBookTable) {
            @Override
            protected void afterCommit(Entity entity) {
                eBookTable.getDatasource().refresh();
            }
        });
    }
}
The standard CreateAction and EditAction are added to the eBookTable table in the init() method with an overridden afterCommit() method that is responsible for refreshing the table datasource. This allows displaying the altered state of the card in the table immediately when the changes are saved and the process moves on to the next stage.
The CreateAction and EditAction standard actions do not reload the datasource after the opened editor is committed; they receive the saved entity instance from the Middleware and simply substitute it in the datasource for the original.
In our case, it is necessary to reload the entity from the database because the process is launched in a separate transaction after saving the edited EBook instance, and the state of the card is changed at the same time. In other words, the EBook instance, which has not yet been changed by the process, is returned after the editor is committed to the datasource. It is necessary to reload the entity from the database in order to display these changes.
Launch the server by clicking -> and log into the application as admin.
Open the -> screen and create a new entry. Select a book publication and enter a full description in the Description field. At this stage, the editor will look as follows:
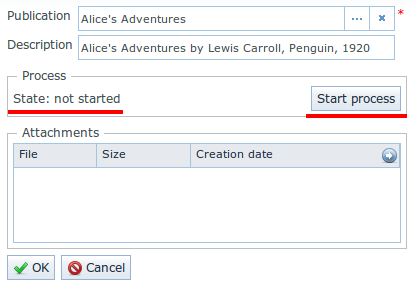
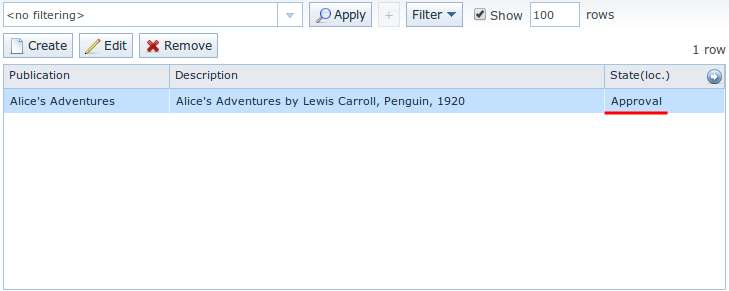
Now you can simply save the card by clicking or immediately start the process by clicking . After the process is started, the editor will close, and the table will show the Approval value in the State (loc.) column. This means that the card is awaiting approval by a manager.
If you now open the card for editing, you will see that all input fields are disabled, and none of the process actions are accessible.
Log out of the system and log in again as manager. Open the -> screen. You will see the assignment that has been nominated to you:
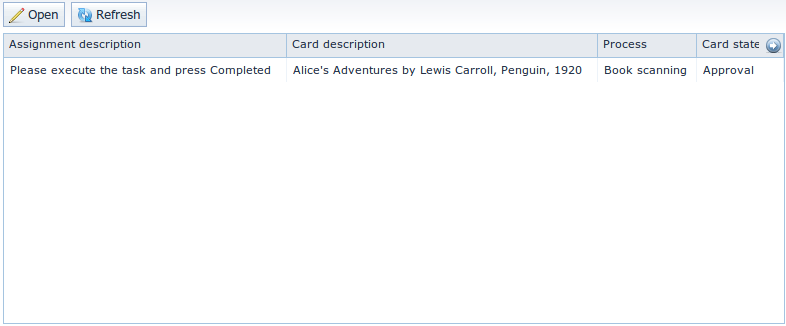
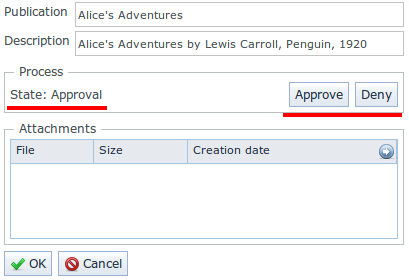
When you click , you will see the card editor that allows you to approve or deny the book scanning:
The same screen can be accessed in the usual way by selecting a row in the browser and then clicking .
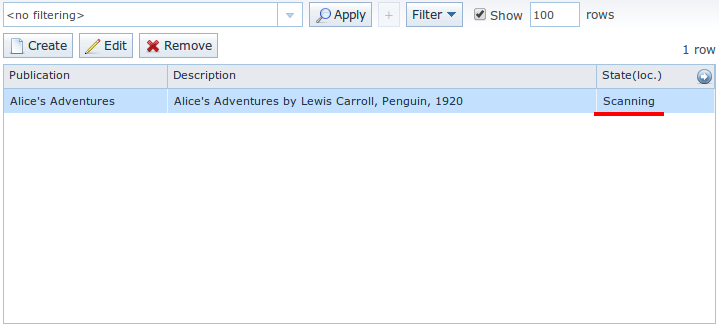
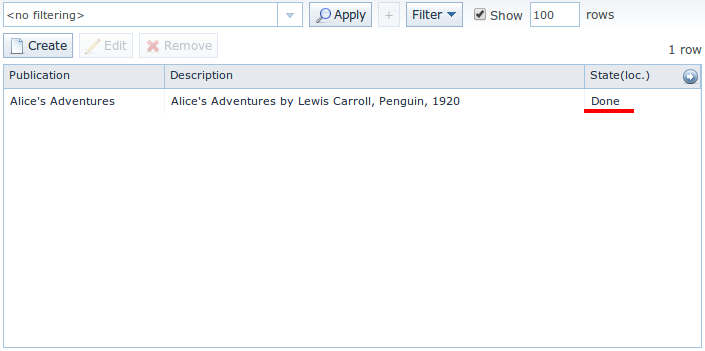
Click . If you have opened the edit screen from the assignments list, this list will now be empty. At this point, the manager has no assignments. If you have opened the edit screen from the EBook list, you will see the changed state of the card:
When you open the card for editing, you will no longer be able to change anything or continue the process, since the next action must be performed by the operator.
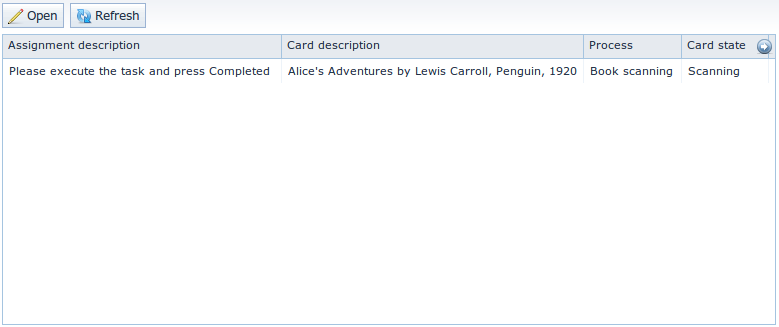
Log out of the system and log in again as operator. Open the -> screen. You will see the assignment that has been nominated to you:
Click in this screen, or go to the -> screen and open the card for editing there. You will see the available process actions: Success and Fail.
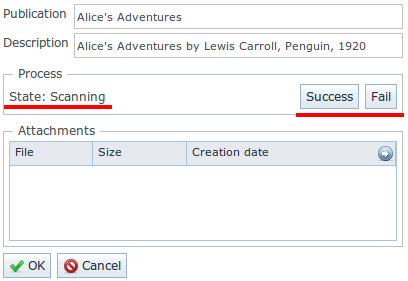
Let us assume that you have completed the book scanning process as the operator. Click . You will see the transition form that was specified in the process.
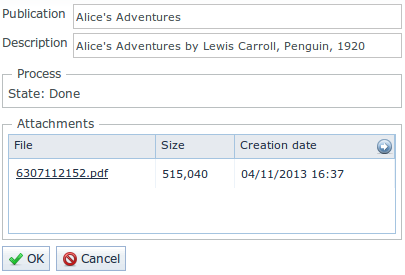
Click and add one or several file attachments. Then click . The form will close, the assignment will disappear, and the card will be assigned the Done state:
When you open the card for editing, you will see the process state and the list of attachments that were added by the operator:
This section lists the application properties relevant to the Workflow subsystem.
- workflow.designerUrl
-
File path to load the visual designer host-HTML file, relative to the URL of the web application.
Default value:
wfdesigner/workflow/main.ftlInterface:
WfConfigUsed in the Web Client block.