Open the -> screen in the web interface of the running application and click . Enter the name of the process design, for example Book scanning, and click . A new CUBA Workflow Designer window will open.
First, drag and drop the Start node onto the designer workspace. Then, drag and drop the Assignment node. Connect the Start node with the Assignment node input. Connect the Start output with the Assignment input. In the Assignment node, set the name to Approval and the role to Manager. Click the button in the Assignment node to create an output and specify its name: Approve. Then, add another output: Deny. As a result, an assignment will be generated for a user with the Manager role when the running process transitions to the Approval state. The process will stop running until the user selects one of the outputs: Approve or Deny.
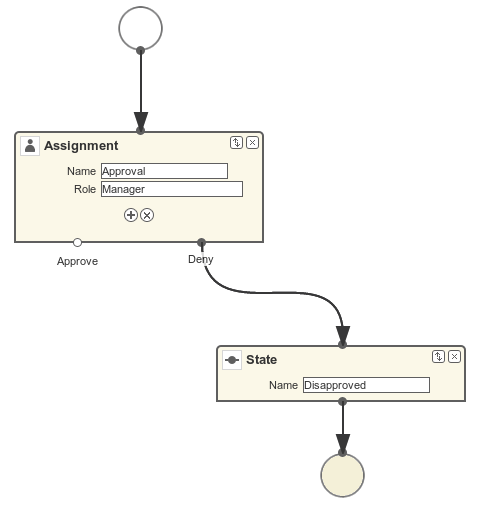
If the manager rejects the process, it should transition to the Not approved state and finish. To register this state, add the State node with the name Not approved and connect its input to the Deny output in the Approval node. Then, add the End node and connect it with the output of the Not approved node. The running process will record the Not approved state in the card (an EBook instance) and finish without stopping.
The following schema should be produced at this stage:

Click to save the current changes.
Add another Assignment node, set its name to Scanning, and assign the Operator role to it. Add the Success and Fail outputs. Connect the Scanning input to the Approve output of the Approval node. As a result, when the process is approved by the manager at runtime, it will transition to the Scanning state, stop running and issue an assignment to a user with the Operator role. The process will resume running after the user completes the assignment by selecting one of the outputs.
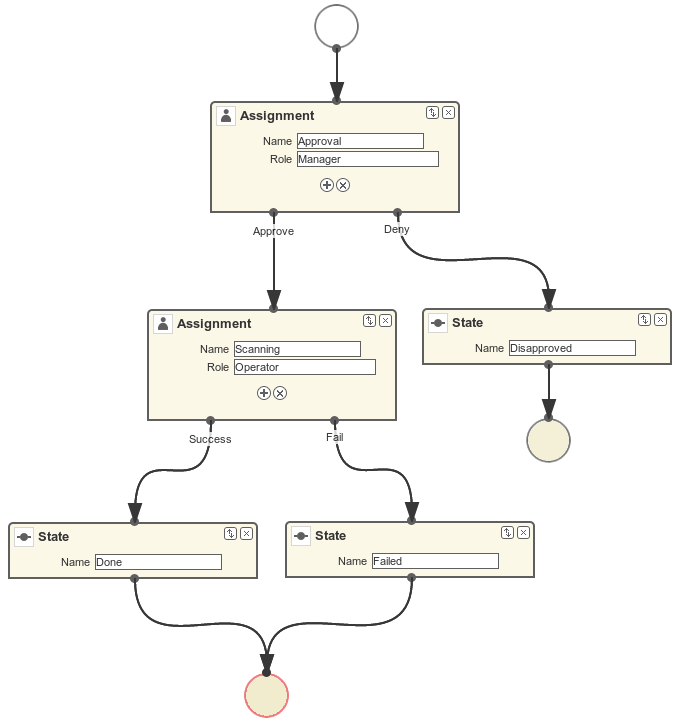
To register the final process state, add two State nodes, Done and Failed, and connect them to the appropriate Scanning output nodes. Then, add another End node and connect it to the Done and Failed node outputs.
As a result the schema should look like this:

If the scanning is successful, the operator must attach the file with the electronic version of the book to the object. To implement this, we will add the form that will be used for interaction between the process and the user.
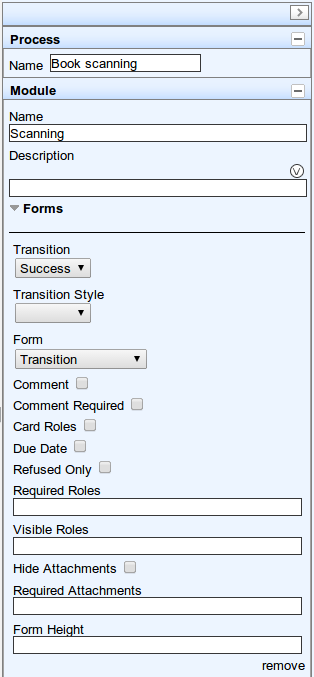
Select the Scanning node and expand the Forms section in the right panel of the designer. Click . Set the following attributes:
-
Transition - the name of the output where the form will be shown. Select
Success. -
Form - the type of the form. Select
Transition. -
Hide Attachments - hide the components for attachment selection. Leave this box empty.
Below are the form settings on the right panel of the designer:

Thus, if the assignment is completed with Success, a dialog form will be displayed, and the operator will be able to add the attachments, i.e. files with the scanned version
of the book.
Save the process design and close the CUBA Workflow Designer window.

